The 18th-century English novel “The Life and Opinions of Tristram Shandy, Gentleman” (better known by its nickname Tristram Shandy – first published in 1759) reached its complete form in 1767. It was released in 9 volumes.
Volume IV of Tristram Shandy has a passage describing the celestial positions of the Sun and planets on a specific date. The passage appears on Page 235 in the Penguin Edition 2003.
When I read that passage, I turned to Stellarium to check the (verifiable) accuracy of the statement. I wanted to “chart the planets” as described and I realized that I could use Stellarium to show the sky on that date.
Martin Luther’s astrological birth chart
Here is the passage from the book – it is from the section where we are being introduced to the treatise on Noses by Hafen Slawkenbergius.
In the section the narrator discusses the disagreements over whether an astrological charting of the planets at the date of his birth tells of the fate of the soul for one, Martin Luther:
“…determining the point of Martin Luther‘s damnation.
The Popish doctors had undertaken to demonstrate a priori ; that from the necessary influence of the planets on the twenty-second day of October 1483 —- when the moon was in the twelfth house — Jupiter, Mars, and Venus in the third, the Sun, Saturn, and Mercury all got together in the fourth — that he must in course, and unavoidably be a damn’d man — and that his doctrines, by a direct corollary, must be damn’d doctrines too.”
Martin Luther’s Birthdate for Stellarium
So, since the date was laid out so precisely, I typed that date into Stellarium and looked at exactly where the Sun and planets were described to be.
The Year 1483,
The Month, October,
The Day, 22.
The sky, was described reasonably accurately. You see the old Moon near Leo, the Sun in Libra (which would have been considered Scorpio in Sterne’s day), Jupiter, Venus, Mars, and Saturn, all lined up in groups as described in the passage.
Here is the image that Stellarium produced for that date:
EDIT: Updated based on Martin Luther’s “new” birthday date.
Since the positions of the sky objects in the first chart were only close to those described in the passage, I moved the birthdate to Martin Luther’s “official” birthday on November 10th, 1483 to see the difference. And, it works better with this new date:
The difference in date might be an error in Laurence Sterne’s text, or it might be a difference in calendaring systems. The Gregorian calendar was not adopted Britain until 1752.
Oddly, (and the case may be made here that the Sterne date is an error) the difference between the date in the book and the date of Luther’s birthday amounts to 19 days, while the day change between the old (Julian) and new calendar (the Gregorian, adopted between 1582 and the 20th century) is 11 days. [Editor’s note: The shrug emoji was made for just this situation. 🤷♂️]
Astronomy is not astrology.
Please note: in the past, astrology and astronomy were one discipline, and the practitioner of astrology was often the court astronomer. These practices have now separated and astronomy is a full-fledged science while astrology is a charming, diverting pastime.
I hope you enjoyed the journey.
I highly recommend Tristram Shandy and Stellarium.
In each, on their own, there is a powerful genius.
How close can I get to the Moon while still staying on the Earth’s surface?
I frame this as a sort of astronomy poem I call an Astronomy Koan. These are short sayings that contain astronomy puzzles. The answers to these puzzles carry insights into physical astronomy concepts.
“I am close the the Moon but not as close as I can be.” This Astronomy Koan invites the reader to consider all of the ways which an Earth-bound observer might get as close to the Moon as humanly possible – without leaving the surface of the Earth.
The Earth and Moon are moving, I am moving
The Moon and the Earth are two oblate spheroids interacting in complex ways.
The Earth-bound observer is able to move around on the surface of the Earth while we calculate the “closest” point of the Moon to be the surface point that is closest to a surface point on Earth.
The goal of the Earth-bound observer is to find the location and time where they will be physically closest to the Moon.
Motions of the Moon that bring the Moon closer and further to your “closest personal point”
Daily apparent revolution – every 24h 50m wherever we are on the Earth surface, the Moon transits (crosses the meridian) and reaches the “closest personal point” at that time.
The apsides of the Moon’s orbit – the Moon’s orbit is slightly elliptical and has an apogee (furthest point from Earth) and a perigee (closest point to Earth). If a perigee coincides with a Moon transit, this brings the Moon even closer to the surface of the Earth. Approximately 357000km (perigee) and 406000km (apogee)
The inclined orbital track of the Moon. Close to the ecliptic, but an additional 5 degrees offset, this gives the Moon an opportunity to be closest to people located on the surface of the Earth who are slightly north (up to 5.14 degrees) of the Tropic of Cancer and south of the Tropic of Capricorn.
The Moon’s orbit is slowly moving away from the Earth (by 3.8cm per year, about 38km in 1million years) – so the longer you wait, the further away it will be!
Surface of the Moon orientation toward my location – East-west libration moves the “orientation” of the Moon as it relates to the Earth
The surface of the Moon has crater walls and valleys. The closest point would be at the height of a crater wall or central peak. Hipparchus crater or Triesnecker crater seem like likely candidates because they are “central”, but this is beyond my understanding of the topology of the Moon surface and how it might interact with the orientation changes caused by libration, nutation, and the inclined orbit.
My motions on the Earth that can get me closer to the Moon
The transit can be made closer by moving closer on the surface of the Earth to the current declination of the Moon. Generally speaking, that involves going toward the equator, but it get complicated by the fact that the orbit is inclined to the equator and ecliptic.
The transit can be made closer by going to a higher elevation
The transit can be made closer by going to the top of a mountain close to the equator (Mt. Chimborazo as opposed to a tall mountain like Everest that is not near the Equator)
The “ideal” situation that would bring a human on the surface of the Earth as close as can be to the Moon would be
Stand at the top of Mt. Chimborazo, at the moment of Moon transit, at the exact orbital perigee, with Hipparchus crater wall oriented toward Mt. Chimborazo, as soon as possible!
Summary
We looked at all of the ways that the Earth and Moon approach and recede from each other. The goal is to understand more directly when I am close to the Moon and observe the motions that change that distance.
Please let me know if I have missed anything here! Add in comments below.
References:
NASA Moon page: https://svs.gsfc.nasa.gov/5048 – has “an animated diagram of the subsolar and sub-Earth points for 2023” Indicates the general sweep of the “closest Moon-Earth point” as it traces out irregular shapes on the surface of the Moon.
Dalle-2 Generated this image of a figure standing, wondering at the cosmos. Prompt: “gentle, happy 8 year old child, standing in a sunset forest, looking through a small, glass-covered hole in the earth that has stars deep inside, digital art, unsaturated colors” – Credit: Daniel Cummings
Heliacal rising.
Sidereal time.
Take a picture of the stars before the dawn every day.
Just before dawn, while the sky is still dark, and the stars are still out.
Tomorrow, the same thing, just before dawn, while the Earth still blocks the Sun.
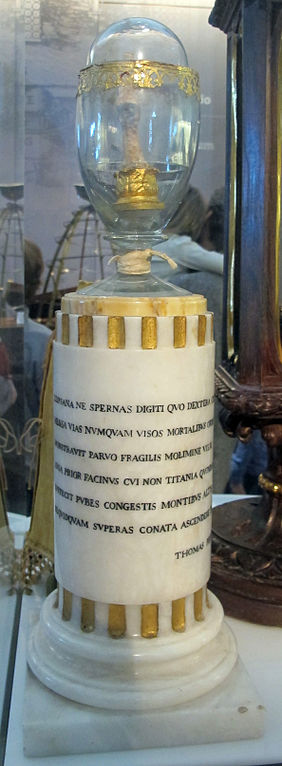
In 1737, Galileo’s body was moved from one burial place to another. During the move several of his fingers and a tooth were removed from the body. Gruesome as it seems, this was a common treatment for the bodily remains of famous people.
One of the fingers – his middle one – eventually ended up in a museum in Florence where it sits (standing straight up) on a marble plinth under a glass jar.
Galilieo’s Middle Finger. From Wikipedia – Photo by User Saliko
Galileo’s science won the day, eventually, and after much suffering. However, thanks to this wonderful museum display, Galileo also got the final word in his epic battle with the powers of the Roman Inquisition – he’s giving them the finger – until eternity.
Learning the Zodiac constellations in order is a great way to get familiar with the ecliptic and the celestial sphere. The Zodiac is not just for astrology – astronomers use the constellations of the Zodiac to name 13 regions of the sky.
Zodiac Constellations zoomed in on Ophiuchus – the “13th” Zodiac Constellation between Sagittarius and Scorpio. The constellation borders (marked red) show how astronomers divide up the sky into named regions.
Zodiac Constellations List
These are the Zodiac constellations in the correct order from Aries to Pisces.
Order
Mnemonic
Name
Description
Emojis
1
All
Aries
Ram
♈ 🐏
2
The
Taurus
Bull
♉ 🐄
3
Great
Gemini
Twins
♊ 👯♂️
4
Constellations
Cancer
Crab
♋ 🦀
5
Look
Leo
Lion
♌ 🦁
6
Very
Virgo
Virgin
♍ 👰
7
Lovely
Libra
Scales
♎ ⚖️
8
Shining
Scorpio
Scorpion
♏ 🦂
9
Orderly
Ophiuchus
Snake-wrestler
⛎ 🐍🤼♂️
10
Stars
Sagittarius
Archer
♐ 🏹
11
Creating
Capricorn
Goat-Fish
♑ 🐐🐠
12
Animal
Aquarius
Water-bearer
♒ 🚰
13
Patterns
Pisces
Fish
♓ 🐟
Table showing the order of the Zodiac Constellations, their names, descriptions, and emojis
Memorize the Constellations of the Zodiac in order
This mnemonic (memory device) can help you remember the correct order of the constellations of the Zodiac. This is the best way to memorize the order of the constellations of the Zodiac. It starts with Aries and ends with Pisces.
“All the great constellations look very lovely; shining, (orderly) stars creating animal patterns.”
Why does the Zodiac constellations list start with Aries?
When astrology was invented it was the same activity as astronomy – observing and cataloging sky objects and their locations) but over the years the two practices have become very different. Astrology is now concerned with how the movement of the skies affects humans while astronomy has become a science. Scientists build knowledge to make predictions about physical events.
During early astrology/astronomy times, the most important thing about the study of the stars was to know where the Sun, Moon, planets, and other solar system objects were located in relation to the steady, orderly background of stars.
Why does the order of the Zodiac constellations read right to left?
The Sun moving “through” Aries into Taurus over a month. Each frame of the animation is about 3 days.
The Sun, Moon, and planets seem to move “through” these 13 constellations in order through the year. Starting with Aries, let’s follow the movement of the Sun against the backdrop of the steady stars. The next constellation that the Sun “moves into” is Taurus. Taurus is to the east (left) of Aries! The Sun appears to move into the next Zodiac constellation about once a month.
Why did we add Ophiuchus to the original 12 Zodiac constellations?
Ophiuchus is a constellation, not an astrology “sign.” However, it is an official constellation that intersects the ecliptic. So, while astrologers do not consider this a Zodiac sign, astronomers include it because the constellation is located on the ecliptic.
The Ecliptic is a path in the sky that solar system objects follow
The solar system objects move generally west-to-east in a small band of the sky – this band of sky is called the ecliptic. All the Zodiac constellations are “on” the ecliptic and all the Sun, Moon, planets and other solar system objects move along the ecliptic over time.
There is another line in the sky called the celestial equator that is an imaginary line the rises from the equator of the Earth. The celestial equator and the ecliptic intersect at a “location” in the sky.
Right now in 2020 that intersection location is “in” the constellation Pisces.
The thin, diagonal line that connects the Zodiac constellations is called the ecliptic. This image shows the ecliptic intersecting with the celestial equator.
However, when astrology was created this intersection point was “in” the constellation Aries.
This image shows the intersection of the ecliptic with the celestial equator in the year 100 BCE.
This was known as the “First Point of Aries.” Astronomer Guy Ottewell writes about this imaginary point in the sky on his website UniversalWorkshop.
Summary
You can learn the order of the Zodiac constellations by using the mnemonic device shown in this article. There is a pathway in the sky that the solar system objects seem to follow. It is called the ecliptic. The Zodiac constellations are the 13 constellations lined up in the sky “on” this imaginary line.
The order of the Zodiac constellations is made because of the way the Sun, Moon, and planets seem to move east-to-west past these constellations in order during the year.
We start the Zodiac names list with Aries because the Zodiac constellations were first named thousands of years ago. At this time, the ecliptic intersected the celestial equator “in” the constellation Aries.
Earth Map in the Sky – Landforms as Constellations
Learn how to see the map of Earth in the starry sky.
Stars help us find our way. Stars are like a giant map in the sky that tells us where we are on the surface of the Earth. Sailors use them as a “map” to navigate the world. For thousands of years, the stars were stationary markers of latitude and longitude.
We are going to learn to map something new onto the sky: locations on the Earth! We can create an exciting new set of “constellations” out of the shapes of the continents on the Earth.
We live on a sphere so we can see half of the sky (a hemisphere) at any one moment. It’s easy to imagine half the Earth mapped onto half the sky. Keep reading to learn how.
A new way to experience life on a sphere. It’s an Earth map projected onto the starry sky. Image created by: Daniel Cummings
Zenith Stars
Wherever you are on the Earth, when you look straight up (toward your zenith), you might see one star, but there are a bunch of other stars within view. All of the stars you see in the sky are directly overhead some other place on the Earth. Every place on Earth has their own set of stars directly overhead – their “zenith stars.”
Look up at any star in the night sky; that star is directly over some place on Earth. There are hundreds of “faraway zeniths” up there.
World Zeniths – See the Map of the Earth in the Sky
Every star maps to a location on Earth and every location on Earth maps to a star.
If you live in the western hemisphere, you can learn to look up and “see” the land borders of the North American and South American continents visible, projected into the sky like a giant painting on a curved ceiling. You can learn to see even more landforms in the sky – you can learn to see the entire western half of the Earth projected in the sky.
Visualize Countries in the Sky
We can learn to see country outlines in the sky. The key is to imagine yourself at the center of the Earth looking out into space “through” a translucent Earth surface.
Here is a good way to visualize these countries-in-the-sky even when you are on the surface. Imagine that you can look up and see your location at the zenith.
When I do this, I see southern New York state, Long Island jutting out into the water like a long pier, and the wide Hudson River emptying past New York City. Eastward is the dark expanse of the Atlantic Ocean and low on the eastern horizon are the countries of Europe and West Africa.
Westward in the sky, I can see the outline of the west coast of the US. Then, there is a big blank space of the Pacific Ocean and a spot near the western horizon that is Hawaii.
The Map of the Earth in the Sky is Reversed
Map of Earth landforms as they map to the starry sky. Map is reversed because it is projected into the sky. The places named at the cardinal directions (N, E, S, W) are the locations where New York horizon stars are zenith stars. Image created by: Daniel Cummings
There is one odd thing about the map as you see it in the sky… it’s reversed – as if seen in a mirror! This happens because we project the map lines outward into space toward the stars. When we look at the map this way it’s as if we are “inside” the Earth looking outward.
The map of the USA covers about 58˚ of sky from east-to-west. 58˚ is about 2x pinky-to-thumb (spread out all your fingers of both hands and touch thumbs). Your left pinky tip should be on your zenith. If you are in New York or somewhere on the east coast, the right pinky tip will indicate the approximate western edge of the USA.
Physical Astronomy – Stars Map to Places on Earth
Physical Astronomy Activity Instructions to learn to see the Map of the Earth in the Sky. Faraway Zenith stars help us visualize what it is like to live on the surface of a sphere. Image created by: Daniel Cummings
Learn to see the zenith map in your sky using this Physical Astronomy technique.
Exercise 1: face south and point high in the sky.
Face south. Then, reach both hands straight up over your head and point above your head with both pointer fingers. You are pointing at your zenith. Now, bring both arms down until they are pointing one due east and one due west. You are pointing at two points in the sky that are zeniths for someone else.
When I do this exercise in New York, my left hand (the eastern) points at a spot in the starry sky that is the zenith star for someone in the country of Nigeria in West Africa. This is a location on the globe that is 6 time zones east. My right hand (the western) points at a spot in the sky that is the zenith for someone in the island state of Hawaii in the middle of the Pacific Ocean. This location is 6 time zones west of New York.
So, when I look at the eastern horizon sky I am looking at the starry sky that is already directly above a place 6 time zones ahead of me. I am looking at someone else’s zenith stars.
Exercise 2: Repeat exercise 1. But this time, face east.
Secret! You Can See a Star That Another Person Can’t
If you do this physical astronomy exercise right after sunset, the eastern and southern zenith locations are in night, but the western and northern sky points are over Earth locations that still have daytime.
This means that you can see the star that is at their zenith, but they cannot see that star. For example, Seattle still has 3 hours of sunlight left in their day so stars are invisible behind blue sky. The city of Yekaterinburg is on the opposite side of the world and just after sunset in New York it faces the Sun and has a bright daytime sky!
We are on the night time side of the Earth and we can see the current zenith stars of Seattle and Yekaterinburg – but people who live in these cities cannot see them! They have to wait to rotate to the night time side of the Earth to see stars.
Project an imaginary map of the Earth into the sky. The map has to be the correct size so that when it is viewed from a distance it “covers” the same distances.
If a map is too close, it is just the same size as the territory. So, we have to choose the correct distance to project the zeniths. As the zenith map “projector screen” moves away from the Earth we see more of the borders of the Earth. But, at some point the distance of the map corresponds exactly to the faraway zeniths.
Our question is: “How far away from the Earth do you have to be so the landforms (like the continents) have an angular diameter that is equivalent to their “actual size” in the sky?” How far away does our imaginary zenith map USA (about 3000 miles wide) image have to be to cover 58 degrees of arc in the sky?
The Earth is approximately 24,901 miles in circumference at the equator. If we can see half the sky from any point on the Earth, then we can “see” half the Earth projected onto the sky by the zenith map. That means that for 180˚ of sky we can “see” about 12,450 miles of the Earth’s surface projected into space. 12,450/180 = 69 miles. When 1 degree of arc spans 69 equatorial miles the image is “at” the correct distance.
1 Degree of Sky equals 69 Miles
So, at the equator every degree of sky covers about 69 miles in every direction. As you go towards the poles the longitude degrees (east and west) cover less and less zenith map distance, but the latitude degrees (north and south) always stretch 69 miles. Every 15˚ of sky equals about 1035 (69*15) miles.
The distance between your pointer finger and your pinky (when you hold your arm and hand stretched out in front of you) is 15˚ – so you are measuring about 1035 miles on Earth with that sky measurement. One pinky width is equal to 1˚, which is 69 miles of zenith map!
The Math – Inverse Tangent and Angular Diameter
There is a simple calculation that helps us determine how far away something needs to be to fill just 1˚ of the sky. Here we use just a tiny drop of trigonometry to discover the “tangent of 1 degree.”
The tangent of 1˚ is 0.017455. The inverse of something is when you divide 1 by the number you want to invert. So, the inverse of 0.017455 (1/0.017455) is 57.29. The inverse of the tangent of 1˚ helps us figure out the distance something has to be to appear to be 1 degree angular diameter.
So, 57.29 * 69 miles = 3,953 miles away! This is how far away the “map” has to be to show you your hemisphere of the Earth map. 3,953 miles is higher than low Earth orbit (LEO) satellites (lower than 1200 miles); it’s closer than geosynchronous satellites (at about 23,000 miles); and it’s about 1/60 the way to the Moon.
So, imagine that the Earth map is projected onto a screen – an imaginary celestial sphere, shell-shaped – that is quite close to the Earth and encircles us. It shows us our Earthen landforms and the oceans beside, superimposed in the sky.
Summary
We live on a sphere. When we look at out night sky we are able to see stars low on our horizon that are visible directly above someone else – one-quarter the way around the around the world in all directions.
If you live within 6 time zones of someone that means that you share some “simultaneous sky.” Anyone living further than 6 time zones away sees a completely different sky – unless you can see circumpolar stars that dip under the North Star. That means that you can see countries past the North Pole and down the other side of the globe.
Your zenith is yours – it is unique and changing all the time. Not even someone standing right beside you shares your zenith. You can use this idea of the zenith stars to comprehend the vast and mysterious experience of life on a sphere.
What would the rest of the solar system look like if you shrank the Sun to the size of an eyeball?
You are the center of the universe.
Well, at least you are for this scale model. You will be the Sun.
Imagine that the Sun shrank to the size of one of your eyeballs (about 24mm diameter) and it got placed inside your head. You are now the Sun, center of the solar system, looking out into the vast expanse of the solar system and space beyond.
Mercury is just 1 meter away – it is microscopic, essentially invisible at one tenth of a millimeter (0.1mm), the tiniest grain of sand. But if you reach out your arm and point your fingertip as far as it will go, you can almost touch it. Swing your arm around and you trace its orbit around your eyeball sun.
Venus is 1.86m (6ft) away – about the height of a tall-ish man. The second planet from your eyeball Sun is a little bit bigger than Mercury, but still almost invisible at the size of a single grain of fine sand (0.2mm).
Earth is 2.5m (8ft, 2in) away – just a bit farther away than Venus. You can’t reach it with your outstretched hand; you would have to take a step towards it. Earth is also a little bit bigger than Venus, but not by much. And at this scale, the Earth is just another fine grain of sand so it’s almost impossible to find anyway.
The Moon, smaller than Mercury, orbits just 0.6cm from the Earth sand. Imagine… your eyeball and two tiny grains of sand held in a 5m (16ft) diameter orbit.
Imagine all the empty space in the solar system. Imagine all humans on the surface of that Earth grain – and we have only visited the first 3 planets.
Mars is smaller than Earth and orbits 3.9m (12ft 10in) away. It is another grain of sand – with a red tint.
Jupiter is 13.4m (44ft) away. Imagine the outside length of a large school bus – that’s how far away Jupiter is. Jupiter is the first planet in this scale model that is visible – it is 2.5mm diameter – at this scale, Jupiter is about the size of a small peppercorn.
Saturn is 24.6m (about 81ft) distant. It has shrunk to the size of half a sprinkle. This sprinkle crumb is far enough away from your eyeball Sun that you probably couldn’t see it.
Uranus disappears at 0.8mm and 50m (162ft) away. It’s about the size of a small ant’s head.
Finally, we reach the similar-sized ant-head Neptune at 0.8mm which is an astonishing 77m (255ft) away at this scale. This is a bit closer than the entire length of a football field or a soccer pitch – Neptune would be at the other team’s 20 yard line or 18 yard line respectively.
Summary
Close your eyes. Imagine your eyeball is the Sun.
All these tiny objects are orbiting your head at different distances in a more-or-less flat plane.
Out. In. Space.
References
Thanks to Guy Ottewell for his insights into how to use everyday objects to communicate the scale of the solar system – especially his groundbreaking Earth as A Peppercorn.
The Moon Hat keeps your head warm – yes! And, every day it gently reminds you to be curious about the Moon. It reminds you to observe what usually stays hidden. It reminds you to #doscienceeveryday.
There are many ways to wear a Moon Hat. You can wear the Moon Hat in at least 10 different ways. The Moon Hat is made of soft stretchy fleece with small embroidered Moon phase images placed all around the brim.
The Moon Hat fabric is flexible and foldable.
10 ways to wear the Moon Hat
Moon Finder – where is the Moon right now
Phase Reminder – what is the Moon phase right now
Hidden Moon outside – hide the moons outside
Hidden Moon inside – hide the moons inside
Tidal Shores no tag – longshoreman style
Tidal Shores show tag – longshoreman style
Moon Slouch – Moon Finder, pull the fleece backward
Moon Beret – Moon Finder, pull the fleece forward
Moon Disk – Hidden Moon inside, show one embroidered disk
Moon Peeker – Hidden Moon inside, peek one embroidered disk
Halfsies (Bonus #11) – Hide half the phases, wear the hat straight
#1 – The Moon Finder
The standard way to wear the Moon Hat with the new Moon image in front. This creates the model of the Moon, Earth, Sun relationship and helps you understand how the motions of the Moon create the phases that we see from Earth.
Get the current Moon phase. Put the hat on with the New Moon image on your forehead. Face the Sun. Now, all of the Moon phase images point to where the Moon is in the sky. Amazing!
#2 – The Phase Reminder
This everyday style is for people who want to remind themselves of the phases of the Moon and how they change over the 29 and a half days of the cycle. Just choose a Moon phase and put it at the front.
This is a subtle way to keep track of the Moon phases and learn their sky location. Before you put on the hat, pause for a second and consider which phase to wear. And, it doesn’t feel like a Moon phase quiz – it’s fun to put your thinking cap on!
#3 – Hidden Moon outside
Don’t want any Moon phases to show? Just fold up the brim toward the outside of the hat and all of the Moon phase images disappear.
Sometimes a hat is just a hat.
#4 – Hidden Moon inside
Another way to hide the Moon phase images… tuck the brim of the Moon Hat towards the inside. All the Moon phase embroidery is now hidden and you have a sleek cap.
Looking for a unique style? The Moon Hat is flexible.
#5 – Tidal Shores no tag
This is the longshoreman style. Turn the Moon Hat inside out and then fold the brim outward. The brim should be wide enough to both show the Moon phase images and hide the instruction tag.
A close-fitting style that uncovers your ears.
#6 – Tidal Shores show tag
Just like the Tidal Shores no tag, but the brim of the hat is folded thinly so that the tag is revealed. You can wear the tag on the side, or the back, or if you are feeling daring, on the front!
This style makes a strong statement – show off the instruction tag.
#7 – Moon Slouch
This is the Moon Finder style, but pull the Moon Hat upwards to get some amount of fabric standing up away from your head and then pull it backward and flatten it for a sleek look
You can easily wear the Moon Hat pulled up above your ears.
#8 – Moon Beret
This is the Moon Finder style, but pull the Moon Hat upwards to get some amount of fabric standing up away from your head and then pull it forward and flatten it for an intense look.
Folding and bunching the fabric in the hat leads to a renaissance or jester look.
#9 – Moon Disk
The Moon Disk style starts with the Hidden Moon inside, but then you pull the embroidered disk of your favorite Moon phase and place it somewhere – it could be centered on your forehead or placed round the side of your head just behind the ear, or all the way at the back. It’s your choice.
This style lets you show an individual Moon image disk.
#10 – Moon Peeker
This style is the same as the Moon Disk, but pull the Moon phase under the fabric of the brim until it is just peeking out. This style looks particularly good when the disk is just in front of your left or right ear.
This look makes a sly statement.
#11 – Halfsies
Fold down half the Moon Hat brim to hide 4 of the phases, then adjust, and angle the hat so that it looks like it is sitting flat on your head.
An alternative way of hanging your hat.
Go out and play with the Moon Hat
This is a fun and flexible bit of fabric with lots of science and a mountain of style potential. Hide and show the Moon phase images, fold and flex the fabric. Get outside and get curious about the Moon and its motion.


